利用blob检测算法识别交通杆,控制TB3机器人完成对交通杆的起停动作!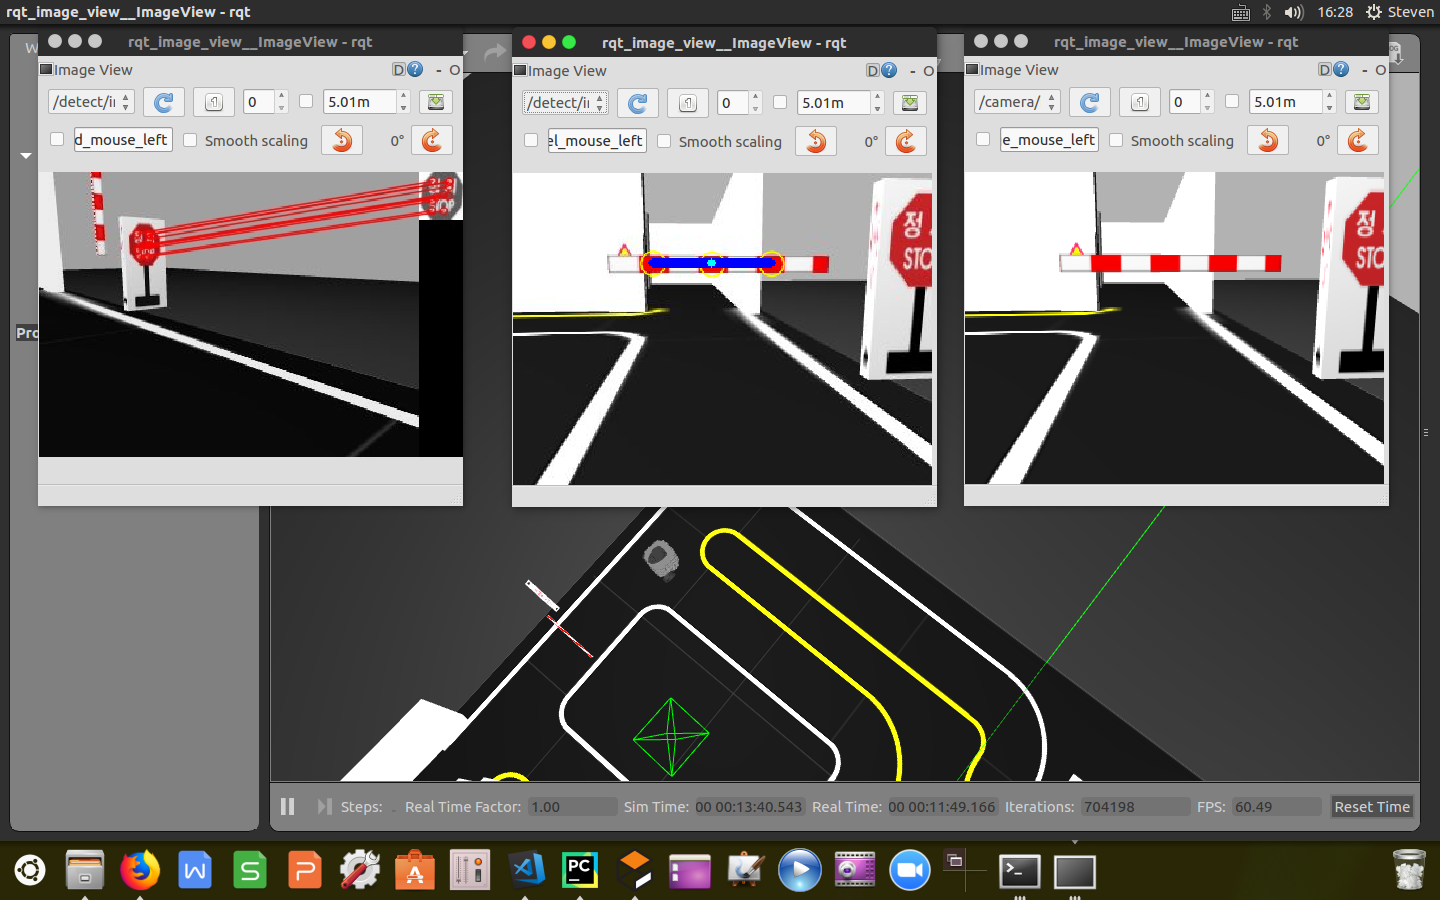
世界尽头的地方,
是雄狮落泪的地方,
是月亮升起的地方,
是美梦诞生的地方。
订阅话题
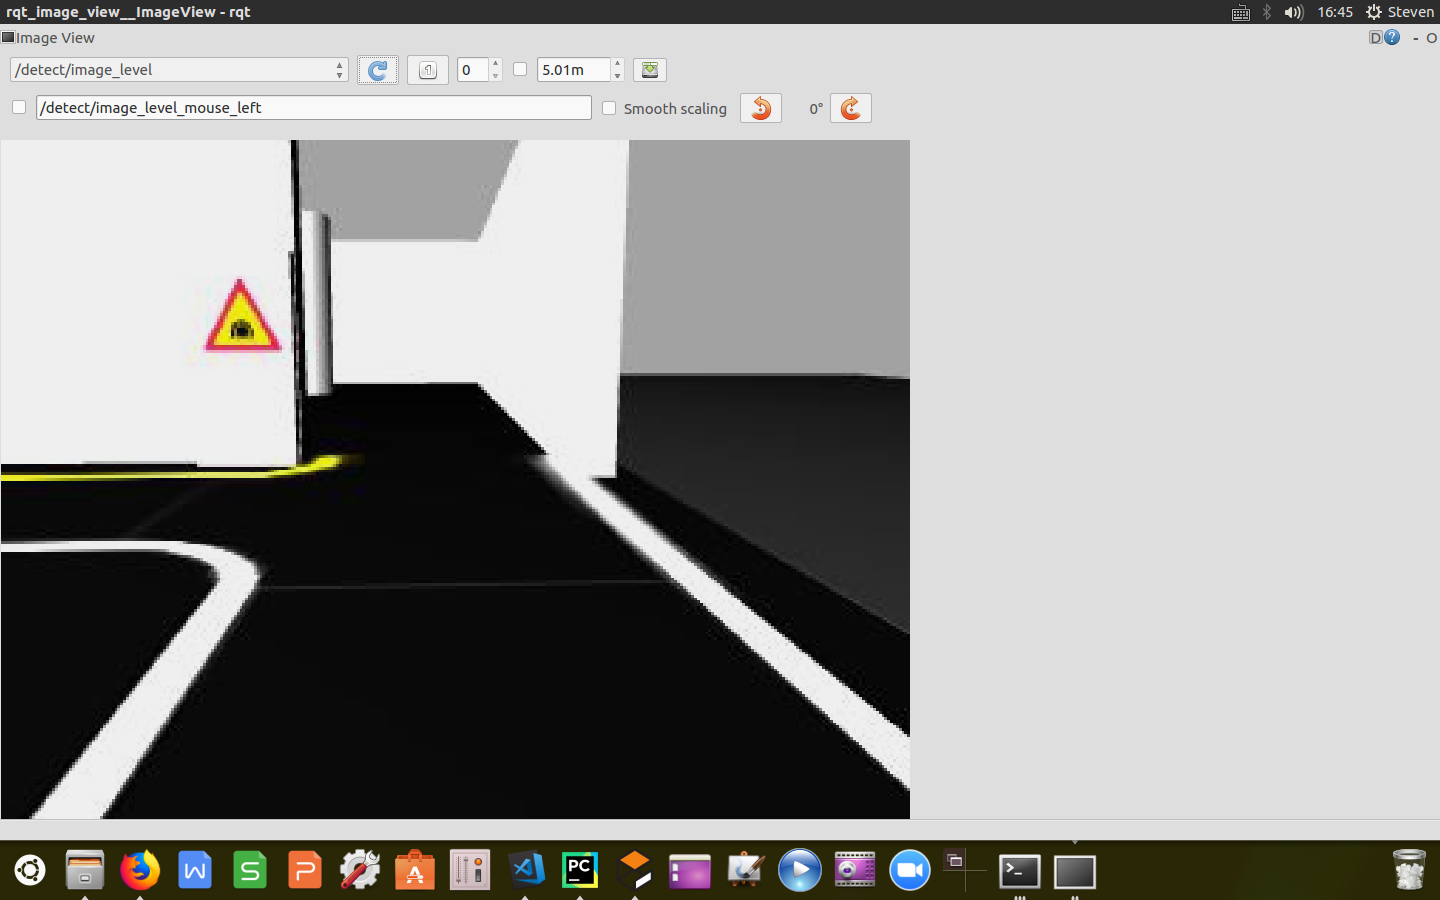
上一篇博文中《TB3_Autorace之路标检测》订阅了原始图像信息,经过SIFT检测识别出道路交通标志,这里我们同样订阅树莓派摄像头的原始图像信息对交通杆进行识别,同时我们还订阅了交通杆的状态信息以及任务完成信息,实现杆落即停,杆起即过的功能。1
2
3
4
5
6
7
8
9
10
11
12
13
14self.sub_image_type = "raw" # you can choose image type "compressed", "raw"
self.pub_image_type = "raw" # you can choose image type "compressed", "raw"
if self.sub_image_type == "compressed":
# subscribes compressed image
self.sub_image_original = rospy.Subscriber('/detect/image_input/compressed', CompressedImage,
self.cbGetImage, queue_size=1)
elif self.sub_image_type == "raw":
# subscribes raw image
self.sub_image_original = rospy.Subscriber('/detect/image_input', Image, self.cbGetImage, queue_size=1)
self.sub_level_crossing_order = rospy.Subscriber('/detect/level_crossing_order', UInt8,
self.cbLevelCrossingOrder, queue_size=1)
self.sub_level_crossing_finished = rospy.Subscriber('/control/level_crossing_finished', UInt8,
self.cbLevelCrossingFinished, queue_size=1)
发布话题
发布图像信息,交通杆的状态信息/detect/level_crossing_stamped、任务开始信息/control/level_crossing_start以及速度控制信息/control/max_vel。
1 | if self.pub_image_type == "compressed": |
设定检测状态
这里我们利用python的枚举操作将路标检测封装为几个不同状态,包括识别标志、检测交通杆、识别交通杆、停车、通过等状态。根据不同的识别状态执行相应的控制指令。1
2
3
4
5
6self.StepOfLevelCrossing = Enum('StepOfLevelCrossing',
'searching_stop_sign '
'searching_level '
'watching_level '
'stop '
'pass_level')
距离计算
计算点到直线的距离,代码封装如下:1
2distance = abs(x0 * a + y0 * b + c) / math.sqrt(a * a + b * b)
return distance
计算点到点的距离(欧式),代码封装如下:1
2distance = math.sqrt((x2 - x1) * (x2 - x1) + (y2 - y1) * (y2 - y1))
return distance
线性判断
利用blob算法检测出的红色块,得出色块的坐标对,根据三点呈一线的原理,计算直线方程并判断检测出的点是否呈线性,代码封装如下:1
2
3
4
5
6
7
8
9
10
11
12
13
14
15
16
17def fnCheckLinearity(point1, point2, point3):
# 判断是否呈线性
threshold_linearity = 50
x1, y1 = point1
x2, y2 = point3
if x2 - x1 != 0:
a = (y2 - y1) / (x2 - x1)
else:
a = 1000
b = -1
c = y1 - a * x1
err = fnCalcDistanceDot2Line(a, b, c, point2[0], point2[1])
if err < threshold_linearity:
return True
else:
return False
距离判断
利用blob算法检测出的三个红色块,得出三个色块的坐标对并计算相互之间的距离,判断距离是否相等,代码封装如下:1
2
3
4
5
6
7
8
9
10
11def fnCheckDistanceIsEqual(point1, point2, point3):
# 判断距离是否相等
threshold_distance_equality = 3
distance1 = fnCalcDistanceDot2Dot(point1[0], point1[1], point2[0], point2[1])
distance2 = fnCalcDistanceDot2Dot(point2[0], point2[1], point3[0], point3[1])
std = np.std([distance1, distance2])
if std < threshold_distance_equality:
return True
else:
return False
格式转换
设定合适的帧率,将订阅到的原始图像信息格式转换成OpenCV库能够处理的信息格式,代码封装如下:1
2
3
4
5
6
7
8
9
10
11
12def cbGetImage(self, image_msg):
if self.counter % 3 != 0:
self.counter += 1
return
else:
self.counter = 1
if self.sub_image_type == "compressed":
np_arr = np.fromstring(image_msg.data, np.uint8)
self.cv_image = cv2.imdecode(np_arr, cv2.IMREAD_COLOR)
else:
self.cv_image = self.cvBridge.imgmsg_to_cv2(image_msg, "bgr8")
注:根据计算机处理能力设定帧率,这里设置成10fps,不合适的帧率设置容易产生掉帧的现象,会影响最终的检测。
提取色块
利用掩膜操作,设定颜色阈值,将RGB图像转换成HSV格式图像,根据颜色阈值提取出交通杆上的红色色块,返回掩膜后的0-1图像。代码封装如下:1
2
3
4
5
6
7
8
9
10
11
12
13
14
15
16
17
18
19
20
21
22
23
24
25
26
27
28def fnMaskRedOfLevel(self):
image = np.copy(self.cv_image)
# Convert BGR to HSV
hsv = cv2.cvtColor(image, cv2.COLOR_BGR2HSV)
Hue_l = self.hue_red_l
Hue_h = self.hue_red_h
Saturation_l = self.saturation_red_l
Saturation_h = self.saturation_red_h
Lightness_l = self.lightness_red_l
Lightness_h = self.lightness_red_h
# define range of red color in HSV
lower_red = np.array([Hue_l, Saturation_l, Lightness_l])
upper_red = np.array([Hue_h, Saturation_h, Lightness_h])
# Threshold the HSV image to get only red colors
mask = cv2.inRange(hsv, lower_red, upper_red)
if self.is_calibration_mode == True:
if self.pub_image_type == "compressed":
self.pub_image_color_filtered.publish(self.cvBridge.cv2_to_compressed_imgmsg(mask, "jpg"))
elif self.pub_image_type == "raw":
self.pub_image_color_filtered.publish(self.cvBridge.cv2_to_imgmsg(mask, "mono8"))
mask = cv2.bitwise_not(mask)
return mask
速度控制
根据订阅到的交通杆状态信息/detect/level_crossing_order,实时发布目前的检测状态以及速度指令控制小车由减速到停车再到启动的全过程。代码封装如下:1
2
3
4
5
6
7
8
9
10
11
12
13
14
15
16
17
18
19
20
21
22
23
24
25
26
27
28
29
30
31
32
33
34
35
36
37
38
39
40
41
42
43
44
45
46
47
48
49
50
51
52
53
54
55
56
57
58
59
60
61
62
63
64
65
66
67
68
69
70
71def cbLevelCrossingOrder(self, order):
pub_level_crossing_return = UInt8()
if order.data == self.StepOfLevelCrossing.searching_stop_sign.value:
rospy.loginfo("Now lane_following")
pub_level_crossing_return.data = self.StepOfLevelCrossing.searching_stop_sign.value
elif order.data == self.StepOfLevelCrossing.searching_level.value:
rospy.loginfo("Now searching_level")
msg_pub_max_vel = Float64()
msg_pub_max_vel.data = 0.10
self.pub_max_vel.publish(msg_pub_max_vel)
while True:
is_level_detected, _, _ = self.fnFindLevel()
if is_level_detected == True:
break
else:
pass
rospy.loginfo("SLOWDOWN!!")
msg_pub_max_vel.data = 0.04
self.pub_max_vel.publish(msg_pub_max_vel)
pub_level_crossing_return.data = self.StepOfLevelCrossing.searching_level.value
elif order.data == self.StepOfLevelCrossing.watching_level.value:
rospy.loginfo("Now watching_level")
while True:
_, is_level_close, _ = self.fnFindLevel()
if is_level_close == True:
break
else:
pass
rospy.loginfo("STOP~~")
msg_pub_max_vel = Float64()
msg_pub_max_vel.data = 0.0
self.pub_max_vel.publish(msg_pub_max_vel)
pub_level_crossing_return.data = self.StepOfLevelCrossing.watching_level.value
elif order.data == self.StepOfLevelCrossing.stop.value:
rospy.loginfo("Now stop")
while True:
_, _, is_level_opened = self.fnFindLevel()
if is_level_opened == True:
break
else:
pass
rospy.loginfo("GO~~")
msg_pub_max_vel = Float64()
msg_pub_max_vel.data = 0.04
self.pub_max_vel.publish(msg_pub_max_vel)
pub_level_crossing_return.data = self.StepOfLevelCrossing.stop.value
elif order.data == self.StepOfLevelCrossing.pass_level.value:
rospy.loginfo("Now pass_level")
pub_level_crossing_return.data = self.StepOfLevelCrossing.pass_level.value
self.pub_level_crossing_return.publish(pub_level_crossing_return)
交通杆检测
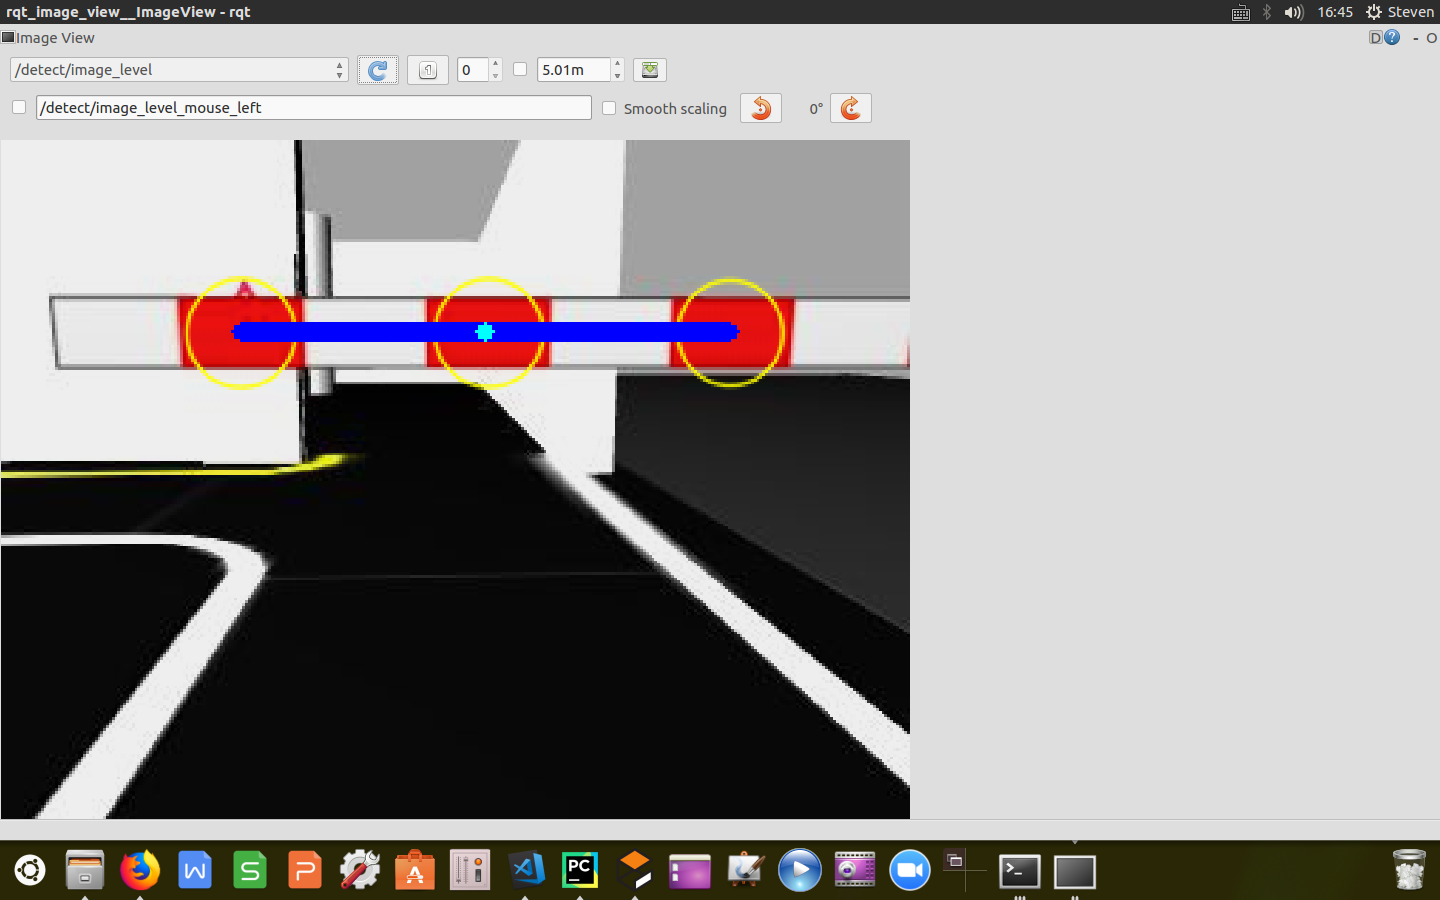
这里主要利用blob斑点检测算法,在上一篇文章中《TB3_Autorace之路标检测》提到的通过设定几个检测指标对掩膜后的图像进行关键点检测,将识别出的色块用黄色圆标识。当检测到3个红色矩形框时,计算关键点的平均坐标以及关键点到平均点的距离列表,通过计算三个红色块之间的距离以及校验三个色块的线性情况判断是否检测到交通杆,将斑点用蓝色线连接标识,计算交通杆的斜率,根据斜率值的大小说明到拦路杆的距离,判断拦路杆的状态;通过计算self.stop_bar_count的值判断交通杆已经收起,小车可以通过,返回交通杆的三个状态(小车减速,停车,通过),代码封装如下:
1 | def fnFindRectOfLevel(self, mask): |
至此,已经完成对交通杆的检测工作,根据交通杆下放过程中实时计算的杆子斜率指标给小车发布速度控制指令,实现了减速,停车,通过全过程。